This mod is in BETA and edge cases may exist. Use at your own risk. Please report any issues you find! Supports Kliff, Damiane, and Oongka -- presets are stored per character and the active preset swaps automatically when you switch who you are controlling in-game.
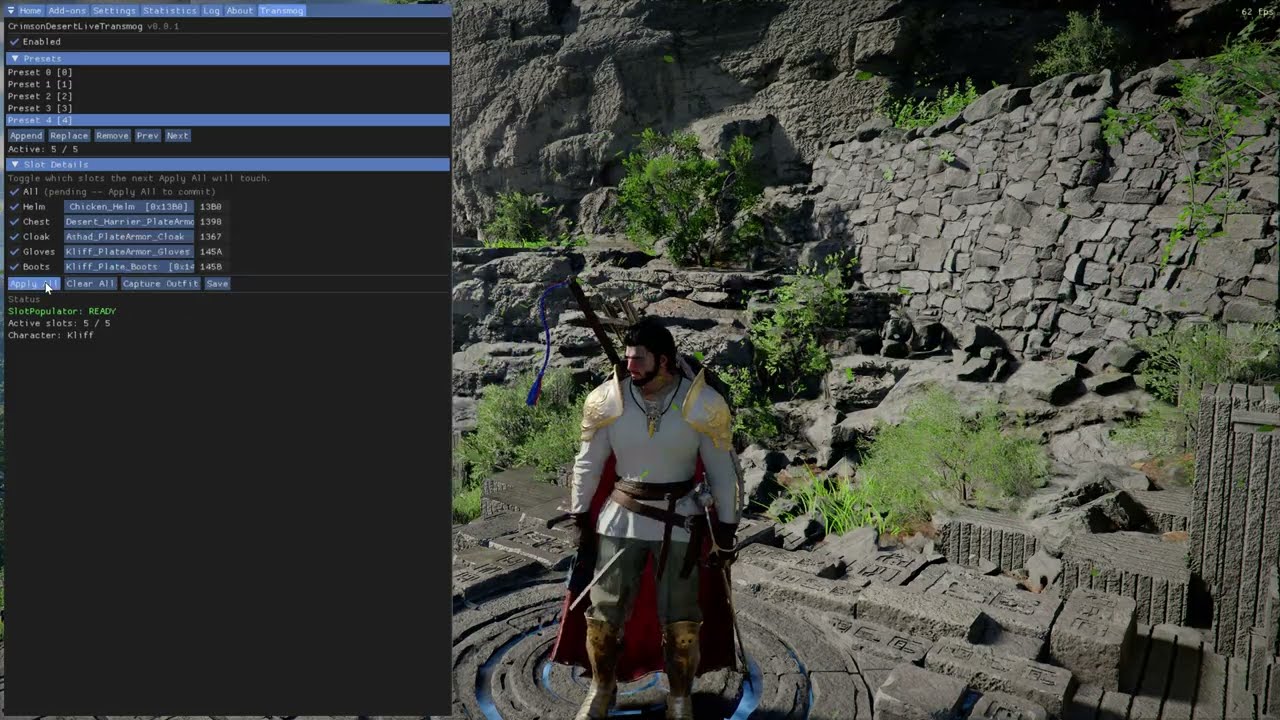
CrimsonDesertLiveTransmog is an ASI plugin for Crimson Desert that lets you change the visual appearance of equipped armor in real time without affecting stats. Browse the full item catalog through a built-in overlay GUI, pick the armor you want to see, build presets, and apply instantly.
- Built-in overlay GUI -- no external tools required (toggle with Home key)
- In-game item browser with search-filterable dropdown, auto-categorized by slot (helm, chest, cloak, gloves, boots, earrings, necklace, rings, lantern, glasses, mask, backpack)
- Optional body-mesh prefab picker for swapping individual prefab variants onto a slot
- Preset system: save, load, rename, and cycle through multiple transmog presets per character
- Multi-character support: independent preset lists for Kliff, Damiane, and Oongka. Every visible protagonist's preset is applied automatically on world entry (and to followers as soon as they're summoned in-game), and the active preset follows whoever you control
- NPC armor variants and damaged variants render via automatic carrier swap
- Body-type picker filter: hides items whose body (male/female) does not match the active character so broken meshes stay out of the list. Per-character override available in the overlay for body-swap mod users
- Per-slot control: enable/disable transmog independently for each equipment slot
- Optional hotkeys: all disabled by default, configurable via INI
- Open-source with full transparency
- Crimson Desert (PC, Steam)
- ASI Loader (e.g. Ultimate ASI Loader)
- ReShade is optional. If installed, the transmog UI registers as a ReShade addon tab. If not, the mod provides its own standalone overlay window.
You need an ASI Loader to load .asi mods. If you already have one (e.g. from another mod), skip to Step 2.
Download the x64 build of Ultimate ASI Loader and place one of the following DLLs into your bin64 folder:
| DLL name | Notes |
|---|---|
winmm.dll |
Recommended, works for most setups |
version.dll |
Alternative if winmm.dll conflicts |
dinput8.dll |
Another alternative |
How to verify: After completing Step 2, launch the game once. If no
CrimsonDesertLiveTransmog.logfile appears inbin64, the ASI Loader is not loading. Try renaming the DLL to one of the other variants listed above.Note: If you are using a newer version of Ultimate ASI Loader and the log file is not generated, try the win64 (x64) build from v9.1.0 instead.
- Download the latest release from the GitHub Releases page
- Extract all of the following into your
bin64folder:CrimsonDesertLiveTransmog.asi- the mod binaryCrimsonDesertLiveTransmog.ini- configurationCrimsonDesertLiveTransmog_display_names.tsv- item display names for the picker (required; without it the picker shows raw ids only)
Launch the game. Press Home to open the transmog overlay.
<Crimson Desert>/bin64/
├── CrimsonDesert.exe                           (Game executable)
├── winmm.dll                                   (ASI Loader)
├── CrimsonDesertLiveTransmog.asi               (This mod)
├── CrimsonDesertLiveTransmog.ini               (Configuration)
├── CrimsonDesertLiveTransmog_display_names.tsv (Item display names, REQUIRED)
├── CrimsonDesertLiveTransmog_presets.json      (Auto-generated preset file)
└── ...
If ReShade is installed, the mod automatically registers as a ReShade addon. Open the ReShade menu (Home key) and find the Transmog tab. No extra setup is needed.
If you prefer the standalone overlay window instead of the ReShade tab, set ForceStandaloneOverlay = true in the INI. The mod will skip ReShade registration entirely and open its own window.
If you use OptiScaler for frame generation or upscaling:
-
Delete
winmm.dll(or whichever ASI Loader DLL you placed) frombin64. OptiScaler will handle mod loading instead -
Open
OptiScaler.ini, find the[Plugins]section, and set:LoadAsiPlugins = true -
Create a
pluginsfolder insidebin64 -
Move
CrimsonDesertLiveTransmog.asi,CrimsonDesertLiveTransmog.ini, andCrimsonDesertLiveTransmog_display_names.tsvinto thepluginsfolder
<Crimson Desert>/bin64/
├── CrimsonDesert.exe
├── OptiScaler.ini                                  (LoadAsiPlugins = true)
├── dxgi.dll                                        (OptiScaler)
├── plugins/
│   ├── CrimsonDesertLiveTransmog.asi
│   ├── CrimsonDesertLiveTransmog.ini
│   ├── CrimsonDesertLiveTransmog_display_names.tsv (REQUIRED, keep in the same folder as the .asi)
│   └── ...                                         (Other ASI mods go here too)
└── ...
If you run into issues, check the OptiScaler documentation for DLL naming and compatibility options.
This applies to any ASI mod, not just this one. If you have other
.asimods, move them into thepluginsfolder as well.
OptiScaler and ReShade both default to the dxgi.dll slot, so one of them has to use a different name. The simplest fix is to rename OptiScaler to another supported proxy name and let ReShade keep dxgi.dll. This is one way to set them up; see the OptiScaler wiki's Compatibility with other mods (ReShade, SpecialK) for the full details and alternative arrangements.
This assumes OptiScaler is already set up as in the section above (installed as dxgi.dll, with the mod in the plugins folder).
Back up first. Before changing anything, zip or rar your
bin64folder. If something stops working, you can revert.
-
In
bin64, rename OptiScaler'sdxgi.dlltod3d12.dll(orwinmm.dll). This frees thedxgi.dllslot for ReShade - and means the ReShade installer in the next step won't overwrite OptiScaler -
Install ReShade (the build with full add-on support is fine). Point the installer at the game's
CrimsonDesert.exeand let it install asdxgi.dll. Load a shader preset.iniif you want one - other shader mods usually ship the.inifor you -
Open
OptiScaler.ini, find the[Plugins]section, and set:LoadAsiPlugins = trueThis is what lets OptiScaler load this mod's
.asifrom thepluginsfolder - without it the transmog mod won't load. -
Launch the game. If it worked, you'll see the ReShade boot notification on startup (and the usual funky shader colors once a preset is active)
<Crimson Desert>/bin64/
├── CrimsonDesert.exe
├── OptiScaler.ini                                  (LoadAsiPlugins = true)
├── d3d12.dll                                       (OptiScaler, renamed from dxgi.dll)
├── dxgi.dll                                        (ReShade)
├── plugins/
│   ├── CrimsonDesertLiveTransmog.asi
│   ├── CrimsonDesertLiveTransmog.ini
│   ├── CrimsonDesertLiveTransmog_display_names.tsv (REQUIRED, keep in the same folder as the .asi)
│   └── ...                                         (Other ASI mods go here too)
└── ...
- Press Home to open the transmog overlay
- In Slot Details, click the picker button next to a slot to browse available armor
- Use the search box to filter by name
- Select an item - changes stay pending until you click Apply All
- Click Apply All to commit all slot changes at once
- Use Append in the Presets section to create a fresh preset with the five armor slots (Helm/Chest/Cloak/Gloves/Boots) ticked and set to (none) -- a hide-armor starting point you can fill in from the pickers. Other slots stay unticked so working items like the lantern aren't accidentally hidden
- Use Copy to clone the active preset's saved state into a new slot. Unsaved picker edits are discarded so you start from a clean baseline you can tweak without touching the source
- Use Save as New to bottle up the current pending state (unsaved picker edits, dye, color overrides) as a brand-new preset. The active preset's saved rows stay untouched, which is the safe path when you started altering an existing preset and want to keep the new look as a separate entry
- Save commits unsaved picker edits back into the active preset. The button turns orange with a
*marker and a[UNSAVED -- click Save]banner appears in the header whenever your edits differ from the stored preset - Use Prev / Next to cycle through saved presets
- Press Home again to close the overlay
Tip: Enable Instant Apply in the overlay to preview items on hover without needing to click Apply All.
Picker controls: Use Up / Down arrow keys (or the on-screen ^ / v buttons) to move the highlight, and Enter to commit. The picker opens scrolled to your current pick. In Prefabs mode, tick Keep open to audition several prefabs without re-opening the popup, and use the in-popup Apply button (equivalent to Apply All) when Instant Apply is off.
Not sure which prefab is which armor? Browse the full Item Catalog for the current game version - a searchable, sortable table of every item ID, slot category, variant/safety flag, and display name.
Naming convention: item names carry a gender marker -
_**w_is the female variant and_**m_the male variant (in most cases).
Some items, such as Dark Marksman's Plate Armor, Odeck's Protector Plate Armor, and The Masked Liberator's Cloth Armor, have separate prefabs for the female and male variants. If the picker selects the wrong variant for your character, follow these steps:
- Tick the Prefabs checkbox in the item search popup.
- Look up the correct prefab name in the Item Catalog.
- Type that prefab name into the search box in the overlay.
Example. Search Dark Marksman's Plate Armor in the catalog. It shows the base (male) prefab, cd_m0001_00_samuel_ub_0001. Note the _samuel_ub_ part. Type _samuel_ub_ into the overlay search box. It returns two records, one of them the female variant:
cd_m0001_00_samuel_ub_0001
cd_phw_m0001_00_samuel_ub_00_0001
Note the extra _00_ in the second name. If there are noisy matches, narrow the search with _samuel_ub_00_0001.
Edit CrimsonDesertLiveTransmog.ini for global settings and optional hotkey bindings.
[General]
LogLevel = Info
Enabled = true
; Launch standalone overlay even when ReShade is installed
ForceStandaloneOverlay = false
; Toggle the overlay GUI. Default: Home
OverlayToggleHotkey = Home
; All other hotkeys disabled by default - set via INI if needed
ToggleHotkey =
ApplyHotkey =
ClearHotkey =
CaptureHotkey =

[Presets]
AppendHotkey =
ReplaceHotkey =
RemoveHotkey =
NextHotkey =
PrevHotkey =

[Experimental]
; --- Color Override ---
; Adds a "Color Override" tab to the per-slot popup that lets you pick
; a custom color for each visible material region on a transmogged
; item, including outfits the in-game dye merchant normally refuses.
;
; HIGHLY EXPERIMENTAL -- disabled by default. Toggle changes take
; effect on the next game launch.
ColorOverride = false

; --- Unmuffle Helm Voice ---
; Removes the plate/heavy-helmet voice muffle on protagonists. NPC
; voices keep their vanilla muffle. Off by default; set to true to remove
; the muffle. Toggle changes take effect on the next game launch.
UnmuffleHelmVoice = false

[Advanced]
; Self-heal search radius (bytes) used to recover an internal game offset
; after a patch shifts it. Leave at the default; only raise it if a future
; game update breaks the mod and a maintainer asks you to. Not for normal users.
SelfHealWindow = 512
Presets are stored in CrimsonDesertLiveTransmog_presets.json (auto-generated alongside the INI).
- Named keys:
T,F3,Numpad1,Mouse4,Gamepad_A, etc. - Modifiers:
Ctrl,Shift,Alt(orLCtrl,RCtrl, etc.) - Multiple combos:
T,Gamepad_LB+Gamepad_Y(T alone OR hold LB + press Y) - Empty value = disabled
See the full list at the Supported Input Names reference.
- [Experimental] Color Override is off by default. Set
ColorOverride = truein the[Experimental]INI section to enable a per-region color picker that paints transmog items (including outfits the in-game dye merchant refuses). Changes take effect on the next game launch. Expect rough edges. - [Experimental] Dye support shipped as a rough POC/MVP, please bear with the UX for now. Note that not every item is dyeable; applying a color to a non-dyeable slot will produce no visual change.
- Helmets: visibility override and voice muffle - while LT is active, the in-game helmet visibility setting is overridden (workaround: set the Helm slot in the LT picker to "(none)" to hide the helmet). Closed-face helmets also muffle your protagonist's voice; enable the experimental Unmuffle Helm Voice option (
UnmuffleHelmVoice = true) to remove it, NPC voices keep their vanilla muffle. Changes take effect on the next game launch. - Some NPC armor seems to have combined with the cloak and other slots. If you apply it and it disappears right afterwards, try setting the cloak slot and other involved slots to none, save, then reapply the armor again.
- NPC armor variants and damaged variants render via carrier -- items tagged
(carrier)in the picker use an automatic carrier swap + character-class bypass to render. Most work; a few may still produce empty slots depending on the item's internal skeleton bindings. - Non-humanoid items crash -- horse tack, pet armor, and wagon gear crash the mesh binder. The "Safe only" filter hides these by default.
- Wrong-slot or non-equipment items will crash - selecting a chest piece for the helm slot, or non-armor items (dog armor, recipes, etc.) crashes the game. Safety filters prevent this by default. Do not disable them unless you know what you are doing.
- Special-effect armor may have visual quirks - armor with particle or emissive (glow) effects (e.g. Marni Laser Helm) may not render those effects correctly. Hair may clip through some helmets. I haven't been able to make these work yet.
- Armor may render white / untextured right after loading - occasionally a transmogged piece (most often the helm) shows up as a plain white, untextured mesh when your preset is auto-applied during world or character load. The item's material has not finished streaming in at the moment the transmog is applied. Workaround: once you are fully in-game, re-apply the transmog - open the overlay (Home) and click Apply All again, or toggle the affected slot off and back on. Re-applying reloads the material and it renders correctly.
- Major game updates may break the mod until a new version is released.
- Only tested with the Steam version.
If you encounter issues:
- Set
LogLevel = Debugin the INI file - Check
CrimsonDesertLiveTransmog.login your game directory - After a game update, the mod may stop working due to memory layout changes
Important
Removing or disabling ASI mods. Ultimate ASI Loader scans subdirectories recursively. Moving an .asi file into a subfolder (e.g. plugins/backup/) does not prevent it from loading. To fully disable an ASI mod, move it outside the game's root directory entirely, or rename the file extension (e.g. .asi.bak).
Still stuck? Open a GitHub issue and include your INI config, log output, and game version.
- Visual Studio 2022 (MSVC with C++23 support)
- CMake (3.25 or newer)
- Git (to fetch submodules)
git submodule update --init --recursive
cd CrimsonDesertLiveTransmog
cmake --preset msvc-release
cmake --build build/release-msvc --config Release --parallel
The output binary (CrimsonDesertLiveTransmog.asi) will be placed in the build directory.
The dev build produces a loader ASI + logic DLL pair, allowing you to rebuild and hot-reload the logic DLL without restarting the game.
cmake --preset msvc-dev
cmake --build build/dev-msvc --config RelWithDebInfo --parallel
Press Numpad 0 in-game to trigger a reload after rebuilding.
Built with DetourModKit for core functionality (AOB scanning, hook management, logging, input).
The C++ sources follow a hard 120-column baseline and DetourModKit's coding conventions (AGENTS.md), codified in .clang-format (clang-format 20), .editorconfig, and an advisory .clang-tidy. Run the formatter over any changed sources before committing and keep it idempotent (clang-format --dry-run --Werror must be silent). Editor IntelliSense and build tasks are configured at the repository-root .vscode/, not under CrimsonDesertLiveTransmog/.
- Frans 'Otis_Inf' Bouma - v1.05.00 AOB shift diagnosis, plus modding direction and guidance
- SoraSkySun - Crimson Desert save editor and game file parser / item data dump
- Slinky - dye info data dump
- hzeemr - crimsonforge, the game-file export tool
- Pearl Abyss - Crimson Desert
- Ultimate ASI Loader by ThirteenAG - ASI loading layer
- SafetyHook by cursey - inline / mid-function hooking
- Zydis / Zycore by Florian Bernd & Joel Höner - x86/x64 disassembly (used by SafetyHook)
- SimpleIni by Brodie Thiesfield - INI configuration parser
- nlohmann/json by Niels Lohmann - JSON preset serialization
- Dear ImGui by Omar Cornut - overlay GUI
- DirectXMath by Microsoft - math primitives
- ReShade by crosire - optional addon host
See CHANGELOG.md for a detailed history of updates.
This project is licensed under the MIT License - see the LICENSE file for details.