The DeskPi Pro is a hardware kit for converting a standard Raspberry Pi 4 from a naked SBC, with limited storage, into a mini PC complete with a power button, cooling, better ports and, via SATA then USB3, 2.5" or M.2 SSD storage.
See CHANGELOG.md for the full history. Highlights:
- [Unreleased] — All distros upgraded to the V2 fan daemon. The
Ubuntu / DietPi / Kali / Manjaro / Fedora installers previously
installed the legacy
pwmFanControl64(V1, no curve support, no poweroff detection); they now installpwmFanControl64V2just like the Raspberry Pi OS installer. The V1 source (installation/drivers/c/pwmFanControl.c) and the correspondingpwmFanControl64build/install target have been removed. Every supported distro now gets the same daemon, the same/etc/deskpi.confcurve, and the same power-button → 5 V cut-off behavior. - [Unreleased] —
deskpi-configmanual levels (1-5) now stop the daemon. Previously the running daemon overwrote the manual PWM token within ~1 s, contradicting the FAQ ("To pin the fan at a specific speed, runsudo deskpi-configand pick one of the static levels"). Options 1-5 now stopdeskpi.serviceso the override sticks; option 7 restarts it. The two copies of the script (installation/deskpi-configandinstallation/drivers/deskpi-config) have been re-unified after drifting apart. - [Unreleased] — Gentler default fan curve. The C default array in
pwmFanControl_v2.cwas{40,75, 50,75, 65,100, 75,100}, sending the fan to 75 % from 40 °C upward — loud and contrary to the FAQ statement "the fan stops automatically". Changed to{40,25, 50,50, 65,75, 75,100}so the fan is off below 40 °C and ramps up smoothly: 25 % → 50 % → 75 % → 100 % at 40 / 50 / 65 / 75 °C. - 2026-06-22 — 5 V cutoff on shutdown fixed. The Raspberry Pi OS installer now deploys
deskpi-cut-off-power.serviceand ships a one-shotsafeCutOffPower64binary, so double-pressing the front power button triggerssystemctl poweroffand tells the DeskPi Pro MCU to cut the 5 V rail ~15 s later.safeCutOffPower.cwas also rewritten to remove awhile(1)busy loop that previously causedType=oneshotservices to wait outTimeoutStartSec. All other distro installers (Ubuntu / DietPi / Kali / Manjaro / Fedora) have been brought in line with the same canonical layout, and all uninstallers are hardened to clean up the new artifacts. - 2026-06-22 — Unified installer / uninstaller.
installation/install.shandinstallation/uninstall.shnow auto-detect the running OS, print a summary, and ask for confirmation before doing anything. They dispatch to the matching per-distro script. Both accept--help,--dry-run,--yes, and--os=<distro>to override detection. - 2026-06-22 —
deskpi-configrewritten with a portable ASCII banner, ANSI colors (auto-disabled when not on a TTY),printf-based serial writes, and input validation. Both copies in the tree are now identical. - 2026-06-22 — legacy
uninstall.shhardened — no morefigletdependency, and the typo'ddeskpi-cutoffpower.servicereference is fixed.
deskpi/
├── README.md              this file
├── CHANGELOG.md           version history
├── FAQ.md                 frequently-asked questions
├── LICENSE                GPLv3
├── installation/          per-distro install / uninstall scripts
│   ├── README.md          file map
│   ├── deskpi-config      interactive fan configurator (sudo ./deskpi-config)
│   ├── uninstall.sh       legacy cross-distro uninstaller
│   ├── DietPi/
│   ├── Fedora/            (deprecated, see Fedora/README.md)
│   ├── Kali/
│   ├── Manjaro/
│   ├── RaspberryPiOS/64bit/   ← recommended for most users
│   └── Ubuntu/
├── installation/drivers/
│   ├── c/                 pwmFanControl64V2 (fan daemon) + safeCutOffPower64 (5 V cut-off)
│   ├── python/            reference Python implementations
│   ├── deskpi-config      mirror of the canonical interactive configurator
│   ├── Deskpi-uninstall   legacy menu-driven uninstaller
│   └── README.md          legacy quick-start (see CHANGELOG for the new layout)
├── imgs/                  screenshots used by README.md / FAQ.md
└── utils/                 firmware update manual + tool
- Google Drive link: DeskPi_PRO_Preinstalled_RaspberryPi_OS_Bookworm_64bit_img
| OS | Status |
|---|---|
| Raspberry Pi OS 64-bit | Tested, recommended for most users |
| DietPi 64-bit | Tested |
| Manjaro ARM 64-bit | Tested |
| Ubuntu 64-bit (24.04) | On testing — dtoverlay=dwc2,dr_mode=host is reported to behave poorly |
| Moodeaudio | Community-tested |
| Volumio (2021-04-24-Pi, 32-bit) | Community-tested |
| RetroPie (32-bit) | Community-tested |
| Fedora aarch64 | Best-effort, see installation/Fedora/README.md |
| All 32-bit images (Raspberry Pi OS, Ubuntu, Manjaro, Kali, Twister OS) | Deprecated. 32-bit binaries are no longer shipped; you must compile them yourself. |
| Windows 10 IoT, Windows 11 | Not supported |
- Make sure the Pi can reach the internet.
- Clone the repository and run the unified installer:
The installer auto-detects your OS, prints a summary of what it is about to do, and asks for confirmation before touching the system.
git clone https://github.com/DeskPi-Team/deskpi.git
cd ~/deskpi/installation
sudo ./install.sh
- If your distribution is not in the list above, the installer will
refuse to run. Override with
sudo ./install.sh --os=<distro>to force a specific path (see./install.sh --help).
The C source files for the daemon live in installation/drivers/c/.
A suffix of 64 on a binary name means 64-bit; 32-bit binaries are
no longer shipped — recompile from source if you need them.
The pre-built binaries do not target Volumio's image. You must set up networking manually first, then run the unified installer.
- Configure
/etc/network/interfaceswith your Wi-Fi credentials:auto wlan0 allow-hotplug wlan0 iface wlan0 inet dhcp wpa-ssid "YOUR WIFI SSID" wpa-psk "YOUR WIFI PASSWORD" - Enable internet access:
volumio internet on - Reboot, then run the unified installer as above.
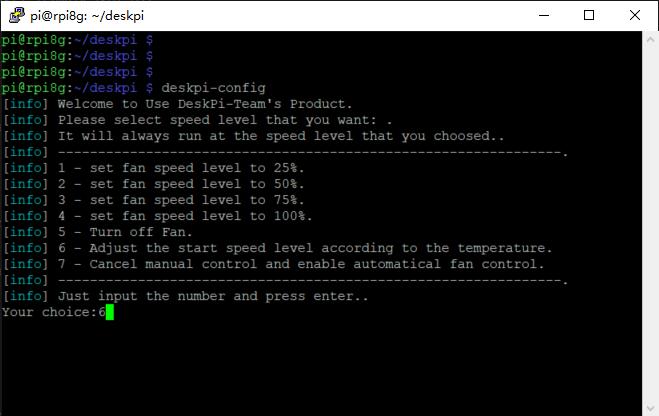
The DeskPi Pro fan is normally driven automatically by deskpi.service
based on the CPU temperature, using the curve defined in
/etc/deskpi.conf. To override that — for example to lock the fan at
50 % while you run a stress test — use the interactive configurator:
sudo deskpi-configThe menu has the following options:
| Key | Action |
|---|---|
| 1 | Pin the fan at 25 % (writes pwm_025) |
| 2 | Pin the fan at 50 % (writes pwm_050) |
| 3 | Pin the fan at 75 % (writes pwm_075) |
| 4 | Pin the fan at 100 % (writes pwm_100) |
| 5 | Switch the fan off (writes pwm_000) |
| 6 | Define a custom temperature→PWM curve (writes /etc/deskpi.conf) |
| 7 | Restore automatic control from the saved curve |
| 0 | Quit |
The default curve when no /etc/deskpi.conf exists is:
| CPU temperature | Fan speed |
|---|---|
| < 40 °C | 0 % |
| 40–50 °C | 25 % |
| 50–65 °C | 50 % |
| 65–75 °C | 75 % |
| > 75 °C | 100 % |
Note: running
deskpi-configstopsdeskpi.serviceso the daemon does not fight with the manual PWM level you just set. Pick option 7 (or runsudo systemctl restart deskpi.service) to put the daemon back in charge.
The same PWM tokens (pwm_000, pwm_025, pwm_050, pwm_075,
pwm_100) can be sent to /dev/ttyUSB0 directly if you want to script
fan control from your own tools.
After initial Raspberry Pi Configuration and once you have Internet Connectivity established, Install the DeskPi Pro Utilities from https://github.com/DeskPi-Team/deskpi.git
Open a Terminal / Console and run the following commands:
sudo apt update
sudo apt full-upgrade
sudo rpi-update
When complete, run:
sudo rebootUpon reboot, open Terminal again:
sudo raspi-config- go to Advanced Options
- Select Boot Order, select #1
USB Boot, Return to Advanced Options, - Select Boot Loader Version, choose
Latest Version - Save & exit
sudo reboot After reboot, re-open Terminal again
sudo -E rpi-eeprom-config --edit• do not change anything, it is unnecessary • press Ctrl-X to save, answer Y to overwrite file.
sudo reboot Now you are ready to install Raspberry-OS onto your USB Boot Device.
You can use the Raspberry Imager from www.raspberrypi.org website.
Depending on device the new SD Card Copier can transfer the SD-Card image to the USB Device (ensure you select generate a new UUID).
Once your USB drive is imaged & ready to boot, shutdown your Deskpi-Pro, remove the SD-Card and power-up to boot from the USB Boot drive, once running & configured you can install your additional software and proceed as usual.
- Tutorial video: https://youtu.be/wUHZb9E_WDQ
- You need to enable
gpio-irfunction by modify/boot/config.txtfile. uncomment this line if not exsit please add it.
dtoverlay=gpio-ir,gpio_pin=17 - Install
lircpackage:
sudo apt-get install lirc- Modify configuration file on location: /etc/lirc/lirc_options.conf and make sure it has following parameters:
driver          = default
device = /dev/lirc0- Reboot your Raspberry Pi and test it with following command:
mode2 -d /dev/lirc1