An external component manager for GameHub (Lite) and its variants — no root required.
-ONLY FOR VERSIONS WITH FILES ACCESS PATCHED INTO THEM!
BannersComponentInjector lets you browse, back up, replace, and restore the Windows-emulation components inside GameHub app variants (DXVK, VKD3D-Proton, Box64, FEXCore, Wine, GPU Drivers, and more) directly from your Android device. Components can be installed from local files or fetched and downloaded straight from online repositories — all without needing root access or a PC.
▶ Watch on YouTube: https://youtu.be/vVAkRjtW9Gk?si=KY-0ujAoaq2zhdvK
- Features
- Supported Apps
- Installation
- How to Set Up
- How to Use
- Supported Component Formats
- Online Sources
- Settings
- Requirements
- Building from Source
Core
- No root required — uses Android's Storage Access Framework (SAF) for secure folder access.
- Single data/ grant — one SAF permission at
<package>/datacovers components, virtual containers, and shadercache simultaneously. - Multi-app support — automatically detects all installed GameHub variants side by side.
- Accurate GameHub detection — borrowed package names (shared with PUBG Mobile, Genshin Impact, AnTuTu, etc.) are verified against the app's display label so real apps are never mistaken for GameHub variants.
- Custom app entries — add any GameHub variant not in the built-in list by entering a display name and package name.
- Fast streaming scanner — components appear progressively as folders are found, with a live "Loading X / Y" counter. Parallel scanning with semaphore limiting keeps load times fast even on large component trees.
- Four-tab layout — Inject Components, Download Components, My Downloads, and My Games (opt-in).
- Landscape NavigationRail — in landscape orientation the top tab row is replaced by a navigation rail on the left side of the screen; content fills the remaining space to the right.
Inject Components
- Backup — back up any component folder to
Downloads/BannersComponentInjector/<componentName>/(or a custom location). - Replace from local file — pick a
.wcpor.zipfrom your device and inject it into the component folder. - Replace from My Downloads — inject any file you've previously downloaded directly, without using the file picker.
- Replace from online source — cross-repo search or drill-down browse; file detail sheet with Release Notes; "Download & Replace" injects directly without leaving the app.
- Restore — restore any component to its backed-up state with one tap.
- Replacement notes — the component list remembers what each folder was last replaced with; cleared automatically on restore.
- Backup warning — warns before replacing an unbacked component, with a "Don't ask again" option and a Settings toggle to re-enable.
- Pull-to-refresh — swipe down on the component list to re-scan the folder.
Download Components
- 9 built-in repositories — StevenMXZ, Arihany WCPHub, Xnick417x, AdrenoToolsDrivers (K11MCH1), freedreno Turnip CI, MaxesTechReview (MTR), HUB Emulators (T3st31), Nightlies by The412Banner, and GameNative.
- Unified GPU Drivers category — Turnip, Adreno, Qualcomm, and Mesa driver files all appear together under a single "GPU Drivers" category.
- Release tag browsing — any individual GitHub release can be enabled as its own browseable category; browse all assets (WCP, ZIP, APK, tar.gz, and more) from a single named release.
- Always-visible cross-repo search — search field above the repo list searches all repositories simultaneously; results show file name, source, and type.
- File detail sheet — tap any file to see its name, source/type chips, published date, file size, and scrollable Release Notes (from GitHub release body); download button is at the top of the sheet for quick access.
- Upload dates and file sizes — shown on every file card and in the detail sheet.
- Sort control — Newest First, Oldest First, Name A→Z, Name Z→A.
- Already-downloaded indicator — files you've previously saved are marked with a checkmark.
- Batch multi-select downloads — enter multi-select mode; pick any number of files; "Download X files" downloads them all in parallel, skipping any already downloaded.
- New-item notification — a dot badge appears on the Download tab when any source has items not seen since the last visit; clears when the tab is opened.
- "NEW" chip on source cards — individual source/repo cards show a "NEW" badge when that specific source has unseen items.
- Custom repositories — add any compatible URL; format is auto-detected. Supports plain GitHub repo links, GitHub Releases URLs, raw JSON feed URLs, and WCP hub JSON feeds.
- Multi-URL custom repositories — combine multiple endpoints (e.g. WCP releases + GPU driver releases) into a single repository card.
- Reorder repositories — use Move Up / Move Down in each repo's hamburger menu to arrange the list in any order you prefer.
- Edit Repository — rename any repository, change its URL, choose which component types it shows, and enable individual release tags as browseable categories.
- Hamburger menu per repo — Open in Browser, Edit Repository, Move Up, Move Down, Remove Repository.
- Refresh All — pre-fetches all sources × all types in parallel and caches results in memory.
- Export repo list — saves your complete repo configuration (custom repos, hidden built-in sources, source order) to
bci-repos.jsonin Downloads. - Import repo list — loads a
bci-repos.jsonfile with a preview dialog; choose Merge (add new repos, keep existing) or Replace (swap all custom repos).
My Downloads
- Browse saved files by Repository → Type → File.
- Auto-refresh on open — the list is refreshed and stale records are pruned every time the tab is opened.
- Inject into GameHub — tap the inject icon on any file to choose an app and a component slot; result shown as a Done/Error snackbar.
- Pull-to-refresh — swipe down to prune stale records (files deleted outside the app); snackbar shows how many were removed.
- Verify Downloads — ☁ icon in the top bar runs the same stale-record check on demand.
- Backups folder at the root gives quick access to all component backups.
- Delete individual records or clear all at once.
My Games Tab (opt-in)
- Enable via Settings → Show My Games Tab.
- Auto-discovers Local games (all subdirs in
virtual_containers/) and Steam games (shadercache/dirs keyed by Steam App ID). - Auto-select on startup — at launch, BCI automatically selects the first GameHub variant that already has access granted; Steam games appear immediately without a manual tap.
- Offline Steam metadata — game name, cover art, genres, description, release year, and Metacritic score are fetched from the Steam Store API and persisted to disk; available without network after first load.
- Steam ISO files — tap the ↓ FileDownload button in the My Games top bar to write
<Game Name>.isofiles toDownloads/front end/for all Steam and imported games on demand. ISO export skips files that already exist, and game names are sanitized (colons and other illegal filename characters replaced) before file creation. - Manual game imports — tap + to add a game by display name and local ID; BCI writes the corresponding
.isotoDownloads/front end/. - Edit game cards — tap any card to open an edit sheet; all fields (name, genres, description, release year, Metacritic score) are editable; "Search Steam" auto-fills fields and links cover art for local import games.
- Launch games — tap the launch button to start a game directly via GameHub's game detail screen.
- ISO creator — write a
.isostub tovirtual_containers/for GameHub launcher compatibility. - Remove from list — hide a local game without touching the filesystem; persists across restarts.
- Remove and delete folder — permanently delete the virtual container folder (+ ISO stub) for a local game via SAF; protected by a confirmation dialog. Fixes the GameHub leftover-folder problem.
General
- Backup Manager — centralised view of all saved backups with per-backup deletion.
- Custom storage locations — independently set a custom folder for Downloads and for Backups via the SAF folder picker.
- In-app update checker — checks GitHub for new releases on demand or automatically on launch (toggleable); shows a scrollable changelog before you decide; downloads the APK with a progress bar and hands it to the system installer.
- Clickable links in release notes — URLs in component release notes and file detail sheets are tappable and open in your browser.
- Full theme customization — Dark mode, AMOLED black, Dynamic Color (Material You on Android 12+), 8 preset accent colours, and a custom HSV colour wheel with brightness slider and hex input.
- Native back button — steps back through navigation states throughout the app.
- Settings on every screen — accessible via the ⚙ icon from the App List, Component List, and Download screens.
BannersComponentInjector detects the following GameHub variants automatically:
| App | Package Name(s) |
|---|---|
| GameHub (Lite) | gamehub.lite, emuready.gamehub.lite |
| GameHub Lite — PuBG Edition | com.tencent.ig |
| GameHub Lite — AnTuTu Edition | com.antutu.ABenchMark, com.antutu.benchmark.full |
| GameHub Lite — Ludashi Edition | com.ludashi.aibench, com.ludashi.benchmark |
| GameHub Lite — Genshin Edition | com.mihoyo.genshinimpact |
| GameHub Lite — Original | com.xiaoji.egggame |
Detection for borrowed package names (shared with real apps like PUBG Mobile, Genshin Impact, and AnTuTu) is verified against the installed app's display label to avoid false positives.
If a variant is not listed, use Add Custom App (+ button in the Inject tab) to add it by package name.
- Go to the Releases page.
- Download the APK for your device architecture:
- arm64-v8a — most modern Android phones (64-bit ARM)
- armeabi-v7a — older 32-bit ARM devices
- x86_64 — x86 emulators / tablets
- On your Android device, enable Install from unknown sources for your file manager or browser (Settings → Apps → Special app access → Install unknown apps).
- Open the downloaded APK and tap Install.
APKs are signed with a stable certificate — they install as updates over each other without needing to uninstall first.
- Open BannersComponentInjector.
- The app shows all detected GameHub variants on your device. Only installed GameHub variants appear — uninstalled entries are hidden.
- Tap the variant you want to manage.
- A guide dialog appears explaining which folder to select. Tap Open Folder Picker.
- In the Android folder picker:
- Tap the ≡ hamburger menu (top-left) and select your GameHub app from the sidebar.
- Navigate to:
data - Tap Use this folder and then Allow.
- The app now has access. Tap the app card again to open the component list.
One grant at
<package>/datacovers everything — components, virtual containers, and shadercache. You only need to grant access once per app variant. Access is remembered across restarts. To remove access, tap the 🔗 unlink icon next to the app card.
Upgrading from v1.9.0: Previous grants pointed to
components/and are no longer valid. Re-grant at<package>/datawhen prompted.
If your GameHub variant uses a package name not listed above:
- Tap the + button in the top bar of the Inject Components tab.
- Enter a Display Name and the app's Package Name.
- Tap Add. The entry appears in the list and works identically to built-in entries.
- Tap it to grant folder access as normal.
This tab is the main workspace for managing components already installed inside a GameHub variant.
- Tap any component card to open its detail sheet.
- Tap Backup Current Contents.
- The component folder is copied to
Downloads/BannersComponentInjector/<componentName>/(or your custom Backups location). - The component card shows a Backup badge once a backup exists.
Always back up before replacing — if something goes wrong you can restore instantly.
- Tap the component card you want to replace.
- Tap Select Local File.
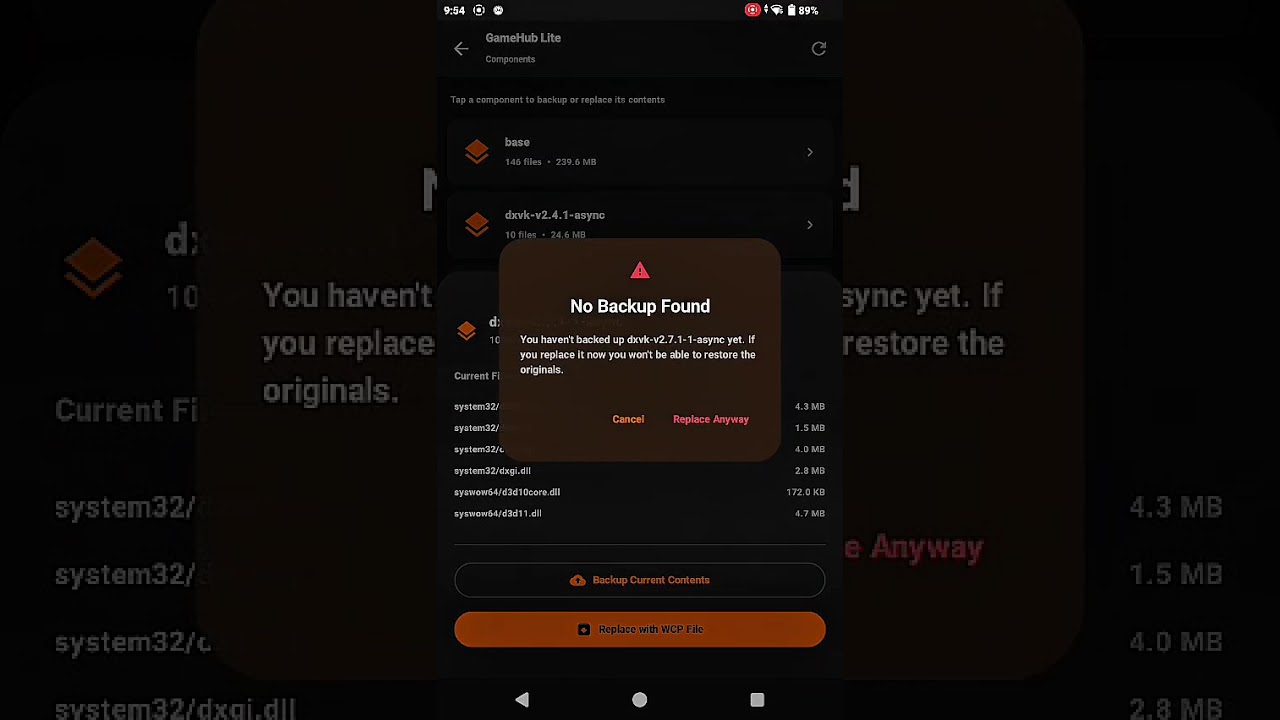
- If no backup exists, a warning appears. Tap Replace Anyway to proceed (or check Don't ask again to skip future warnings).
- In the file picker, select your
.wcpor.zipfile. - The app extracts the file into the component folder. A snackbar confirms success.
- The component card shows a Replaced note with the file name.
- Tap the component card you want to replace.
- Tap From My Downloads.
- A sheet appears listing all previously downloaded files. Tap one to inject it directly — no file picker needed.
- A snackbar confirms success or shows the error.
- Tap the component card you want to replace.
- Tap Select Online Source.
- At the top of the sheet, a search bar lets you search across all repositories at once. Type to see matching files from any repo — tap a result to open its detail sheet.
- Or browse manually:
- Step 1 — Choose a repository: tap any repo card to drill in.
- Step 2 — Choose a component type: select the category (DXVK, VKD3D, Box64, FEXCore, GPU Drivers, Wine, etc.) or any individual release tag you've enabled.
- Step 3 — Choose a file: sorted list with published date. Tap any file to open its detail sheet.
- The detail sheet shows the file name, source, type, date, size, and Release Notes (if available). The download button is at the top of the sheet.
- Tap Download & Replace. A progress indicator shows download status. The component folder is updated on completion.
Repo cards have a ⋮ menu: Open in Browser, Edit Repository, Move Up, Move Down, Remove Repository.
- Tap the component card (must have a Backup badge).
- Tap Restore Original Backup.
- Confirm in the dialog. The component folder is restored from the backup copy.
- The Replaced note is cleared from the component card.
This tab lets you browse online repositories and save component files to your device for later use.
A dot badge on the tab label indicates one or more sources have items you haven't seen yet. Source/repo cards that have unseen items show a "NEW" chip. Both clear when you open the tab.
The search bar at the top of the tab searches all repositories at once as you type. Results show the file name, source, and component type. Tap a result to open its detail sheet.
Tap the ☑ checkbox icon in the top bar to enter multi-select mode. Tap files to select them (checkboxes appear). Tap Download X files to save all selected files in parallel. Already-downloaded files are automatically skipped.
- Select a repository from the list.
- Select a component type — types shown are those the repository actually provides. GPU driver files (Turnip, Adreno, Qualcomm, Mesa) appear together under GPU Drivers. Any individual release tags you've enabled for that repo appear as additional entries in the list.
- Browse the file list:
- Each item shows its name, upload date (where available), file size, and a checkmark if you've already downloaded it.
- Files are sorted newest first by default.
- Tap the Sort button (top-right) to switch: Newest First, Oldest First, Name A→Z, Name Z→A.
- Tap a file to open its detail sheet. The detail sheet shows the file name, source/type chips, published date, file size, and scrollable Release Notes (if available). The download button is at the top of the sheet.
- Tap Download to Device to save it to
Downloads/BannersComponentInjector/<Repo>/<Type>/<filename>(or your custom Downloads location).
Each repository card has a ⋮ menu with options:
- Open in Browser — opens the repository's GitHub page in your browser.
- Edit Repository — opens the edit dialog (see below).
- Move Up / Move Down — reorder the repository in the list.
- Remove Repository — removes the repository from your list (built-ins can be restored with Restore Default Repositories at the bottom of the list).
Tap ⟳ Refresh (top-right when no repo is selected) to pre-fetch all sources and cache the results in memory for instant browsing and search.
Tap ⋮ → Move Up or ⋮ → Move Down on any repo card to shift it up or down in the list. The order is saved automatically and persists across restarts.
Tap + in the header to open the Add Repository dialog.
- Enter a Repository Name.
- Enter a URL in the URL field. Supported URL formats:
- A plain GitHub repo link:
https://github.com/{owner}/{repo}— the app reads the folder structure directly from the repo; each folder becomes a component category. - A GitHub Releases URL:
https://github.com/{owner}/{repo}/releases— the app scans release assets for.wcpor.zipfiles. - A raw JSON feed URL ending in
.json(WCP JSON format).
- A plain GitHub repo link:
- To combine multiple endpoints into one card, tap + Add another URL. Repeat for more.
- Tap Add. The app auto-detects the format of each URL.
Tap ⋮ → Edit Repository on any card.
- Change the name or URL.
- Component Types — existing configured types always appear first, followed by any newly discovered ones (labelled new). Check or uncheck categories to control which ones are shown.
- Additional Releases — individual GitHub releases listed by name/tag; each can be enabled as its own browseable category.
- Tap Save to apply.
Tap the ↓ FileDownload icon in the source list header (between Refresh and Add) to export your entire repo configuration to a JSON file.
The export includes:
- All custom repositories you've added (name, URL, format, types, extra endpoints, release tags)
- Any built-in sources you've hidden via Remove Repository
- Your current source order
The file is saved as Downloads/BannersComponentInjector/bci-repos.json and overwrites any previous export. A spinner is shown while writing; a snackbar confirms the path on success.
Tap the ↑ FileUpload icon in the source list header to import a bci-repos.json file.
- A file picker opens — select a
.jsonfile. - A preview dialog appears showing:
- All incoming custom repo names (with their source icon)
- Which built-in sources will be hidden (if any)
- Whether source order will be applied
- Choose how to apply:
- Merge (default) — adds repos not already in your list; your existing repos stay untouched.
- Replace — removes all current custom repos and replaces them with the imported set.
- Tap Import to apply. The source list refreshes immediately.
The hidden-defaults and source order from the file are always applied regardless of Merge/Replace mode.
Browse and manage all files previously downloaded via the Download Components tab.
- The list is grouped by Repository → Type → File.
- The list auto-refreshes every time the tab is opened — stale records for files no longer on disk are pruned automatically.
- A Backups folder at the root gives quick access to all component backups.
- Inject into GameHub — tap the inject icon (↑ arrow) on any file card to open a two-step picker: choose the GameHub app, then choose the component slot. A snackbar shows Done or the error message.
- Swipe down (pull-to-refresh) to verify all download records — stale records for files deleted outside the app are pruned.
- Tap the ☁ icon in the top bar to run the same check on demand.
- Tap the 🗑 icon on any file to remove its download record.
- Tap Clear All in the top bar to remove all records at once.
Removing a record only removes the tracking entry — it does not delete the file from your device.
Enable this tab in Settings → Show My Games Tab.
Once enabled, BCI automatically selects the first GameHub variant that already has data/ access granted — the game list loads immediately. If no app is pre-selected, tap a variant to grant access. The tab auto-discovers two types of games:
- Local games — every subdirectory in
virtual_containers/. - Steam games — every subdirectory in
shadercache/(directory name = Steam App ID).
Steam metadata (name, cover art, genres, description, release year, Metacritic score) is fetched from the Steam Store API and cached to disk — available offline after the first load.
Tap any game card to open the edit sheet:
- Edit name, genres, description, release year, and Metacritic score manually, or
- Tap Search Steam and type a game name to auto-fill all fields and link the cover art (useful for local import games that aren't already on Steam).
- Tap Save to apply.
Tap the Launch button on any game card to start the game directly via GameHub's game detail screen.
Tap the ↓ FileDownload button in the My Games top bar to write <Game Name>.iso files to Downloads/front end/ for all Steam and imported games on demand. Steam ISOs contain the Steam App ID (plain text); imported game ISOs contain the local ID. BCI skips any file that already exists in the destination and sanitizes game names (removing colons and other illegal filename characters) before writing. These ISO files are used by front-end launchers for compatibility.
Tap the + button in the My Games header to add a game that isn't auto-discovered:
- Enter a Display Name and a Local ID.
- Tap Add. BCI saves the entry and writes
<Display Name>.isotoDownloads/front end/.
Manually added games appear in the Local Games section and support Edit, Remove from list, and Remove and delete folder.
Tap the Create ISO button on a game card to write a .iso stub to virtual_containers/ — required for GameHub launcher compatibility with certain game entries.
Local game cards have two removal options in the ⋮ menu (below a divider, separate from Edit/Reset):
-
Remove from list — hides the game from My Games without touching any files. The
virtual_containers/<gameId>folder stays intact on disk. The hidden state is saved to SharedPrefs and persists across app restarts. Useful for dummy entries or old installs you don't want to see. -
Remove and delete folder — shows a confirmation dialog, then permanently deletes the
virtual_containers/<gameId>/directory via SAF and removes the companion<gameId>.isostub if present. Use this to properly clean up games that GameHub's dashboard uninstalled but left the virtual container folder behind.
These options appear only on local game cards. Steam game cards are not affected.
Access from:
- The ☁ icon in the Component List top bar.
- The ☁ icon in the Download Components top bar.
- Settings → Backup Manager.
- The Backups folder in the My Downloads tab.
Lists every saved backup across all components and apps. Tap the 🗑 icon next to any entry to remove it permanently.
Automatic check on launch:
- Open Settings → Updates.
- Enable Check for updates on launch.
- Each time the app starts, it silently checks GitHub. If a newer version is found, a dialog appears showing the version, installed version, and a scrollable What's new changelog. Tap Download & Install, View on GitHub, or Not Now.
Manual check:
- Open Settings → Updates.
- Toggle Include pre-releases if desired.
- Tap Check for Updates.
- If an update is available, a card shows the version and a scrollable changelog. Tap Download & Install to stream the APK with a live progress bar and launch the system installer, or View on GitHub to open the release page.
- Open Settings → Appearance.
- Display Mode — toggle Dark Mode on or off. When dark mode is on, check AMOLED Black for a pure #000000 background ideal for OLED screens.
- Material You (Android 12+) — enable Dynamic Color to derive the theme palette from your wallpaper. This overrides the accent colour and disables the AMOLED option.
- When Dynamic Color is off, choose one of the 8 preset swatches: Orange (default), Blue, Purple, Green, Red, Teal, Pink, or Amber.
- For a fully custom colour, tap Custom: drag the colour wheel, use the Brightness slider, or type a hex value.
- All changes update live and are saved automatically.
A tar archive compressed with Zstandard (zstd) or XZ. Contains:
profile.json— metadata: type, version name, description, and file mappings.system32/andsyswow64/subdirectories with DLL files.
Extraction behaviour:
FEXCoretype → files are extracted flat to the component root.- All other types →
system32/syswow64directory structure is preserved.
A plain ZIP archive with a meta.json file and flat .so library files. Detected by magic bytes. Always extracted flat to the component root.
When browsing a repository's individual release tags, all assets are shown regardless of file type — WCP, ZIP, APK, tar.gz, etc. Files are downloaded as-is.
| Repository | Component Types |
|---|---|
| StevenMXZ / Winlator-Contents + Adreno-Tools-Drivers | DXVK, VKD3D, Box64, FEXCore, Wine, Proton, GPU Drivers |
| Arihany / WinlatorWCPHub | DXVK, VKD3D, Box64, FEXCore, Wine, Proton, GPU Drivers |
| Xnick417x / Winlator-Bionic-Nightly-wcp | DXVK, VKD3D, Box64, FEXCore, Wine, Proton |
| K11MCH1 / AdrenoToolsDrivers | GPU Drivers |
| whitebelyash / freedreno_turnip-CI | GPU Drivers |
| maxjivi05 / Components (MTR) | Auto-detected from repo folders |
| T3st31 / HUB Emulators | DXVK, VKD3D, Box64, FEXCore, Wine, WowBox64, GPU Drivers |
| The412Banner / Nightlies | Box64, FEXCore, VKD3D, DXVK, WOWBox64 |
| GameNative | GPU Drivers, DXVK, Proton, FEXCore, WOWBox64 |
GPU Drivers consolidates Turnip, Adreno, Qualcomm, and Mesa driver files into a single unified category.
| Section | Setting | Description |
|---|---|---|
| General | Default Start Tab | Choose whether the app opens to Inject Components or Download Components. |
| Appearance | Dark Mode | Toggle between light and dark theme. |
| Appearance | AMOLED Black | Pure #000000 background; available when dark mode is on and Dynamic Color is off. |
| Appearance | Dynamic Color | Use Material You wallpaper-derived colors (Android 12+); overrides accent and disables AMOLED. |
| Appearance | Accent Color | 8 preset swatches or a fully custom colour via the HSV colour wheel + hex input. Hidden when Dynamic Color is on. |
| Prompts | Backup warning | Toggle the "No Backup Found" warning shown before replacing an unbacked component. |
| Storage | Downloads Location | Set a custom folder for downloaded component files. Defaults to Downloads/BannersComponentInjector/. |
| Storage | Backups Location | Set a custom folder for component backups. Defaults to Downloads/BannersComponentInjector/. |
| Updates | Check for updates on launch | When enabled, the app silently checks for a newer release on every startup and shows a dialog if one is found. |
| Updates | Include pre-releases | When enabled, the update checker also considers pre-release builds. |
| Updates | Check for Updates | Manually checks GitHub for a newer version and offers in-app download + install. |
| Utilities | Show My Games Tab | Shows or hides the My Games tab. Off by default. |
| Utilities | Backup Manager | Opens the centralised backup list. |
| Utilities | Open Downloads Folder | Opens the system Downloads folder. |
| Utilities | Report Issue / Feedback | Opens the GitHub Issues page in your browser. |
- Android 10 (API 29) or later.
- One or more GameHub app variants installed on the device.
- No root required.
- Internet access required for online sources and the update checker.
git clone https://github.com/The412Banner/BannersComponentInjector.git
cd BannersComponentInjector
./gradlew assembleDebug
The APK is output to app/build/outputs/apk/debug/.
Dependencies (all resolved via Gradle):
- Jetpack Compose + Material 3
- AndroidX Activity, Lifecycle ViewModel, DocumentFile (SAF)
- Apache Commons Compress — WCP/tar extraction
com.github.luben:zstd-jni— Zstandard decompressionorg.tukaani:xz— XZ decompression- Coil 2.6.0 — image loading (Steam cover art)
- Material Icons Extended
BannersComponentInjector is an independent third-party tool and is not affiliated with, endorsed by, or connected to the GameHub or Winlator projects.